
こんな人にオススメの記事です
- インターネット接続が突然不安定になった方
- ルーターやモデムを交換してもインターネット接続が不安定な方
- ネットワークの設定を初期化したい人
Windows11でネットワークをリセットするには以下の手順で行います。
- タスクバーにある[Windowsボタン]をクリックし、[設定]をクリック
- [ネットワークとインターネット]→[ネットワークの詳細設定]の順番にクリック
- [ネットワークのリセット]→[今すぐリセット]→[はい]の順番にクリック
- パソコンを再起動
- Windowsアップデートからドライバーを更新
有線LANでのインターネット接続が頻繁に切断と接続を繰り返してしまう場合や、Wi-Fiが頻繁に切断と接続を繰り返してしまう場合はパソコンのネットワーク設定をリセットすることで改善する可能性があります。
この記事では、パソコンのネットワークをリセットする方法を詳しく解説していきます。
ネットワークのリセットを行う前に最低限確認したいこと
ネットワークのリセットを実行すると、上述したとおり過去に接続したWi-Fiの接続情報も消えてしまいます。
Wi-Fiの接続情報は、ネットワークドライバーをアップデートし直すことで復元する可能性はありますが、ネットワークドライバーをアップデートするためにはインターネット接続が必要になります。
そのため、有線でインターネットに接続できないノートパソコンなどを使っている場合は、ネットワークのリセットを行う前に、Wi-Fiの接続情報(SSIDやパスワード)を確認しておくことをオススメします。
Wi-Fiの接続情報(SSIDやパスワード)を確認する方法はこちらの「接続しているWiFiのパスワードをパソコンで見る方法 Windows11」で詳しく解説しているので、是非御覧ください。

ネットワークのリセット方法
ここからは、実際の画面も交えながら、ネットワークのリセットする(すべてのネットワークアダプターを出荷時段階に戻す)方法を詳しく解説していきます。
Windowsの設定画面を開く
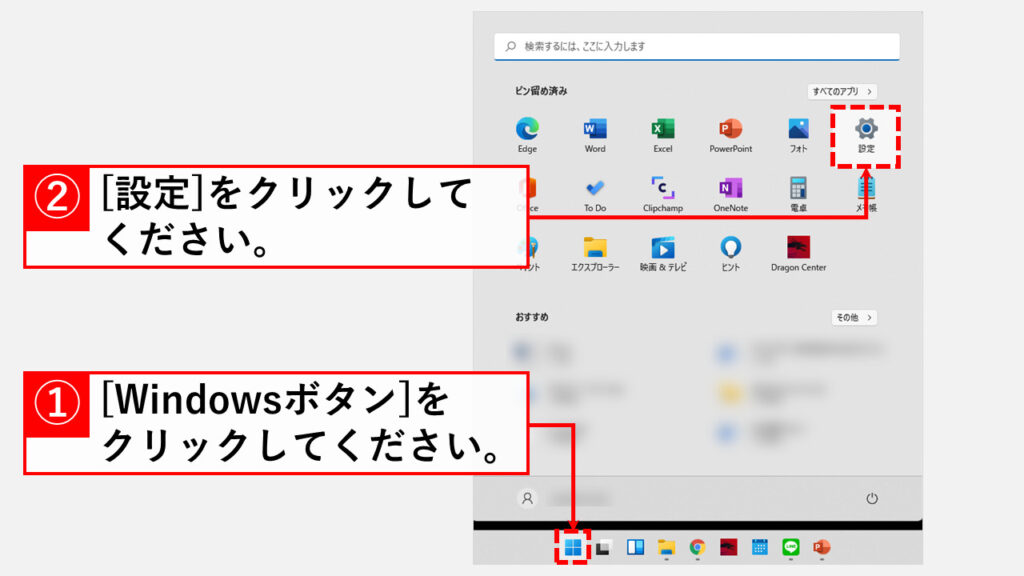
タスクバーにある[Windowsロゴ]をクリックして(キーボードのWindowsを押して)ください。
[Windowsロゴ]をクリックすると上に向かってメニューが展開されます。
展開されたメニューの右上にある歯車のアイコン[設定]をクリックしてください。
[ネットワークとインターネット]をクリック
[設定]をクリックすると、「システム」と大きく書かれたWindowsの設定ウィンドウが立ち上がります。
その中の左側にある[ネットワークとインターネット]をクリックしてください。
![ネットワークのリセット方法 Step2 [ネットワークとインターネット]をクリック](https://jo-sys.net/wp-content/uploads/2022/09/パソコンのインターネット接続が不安定なときに試してほしいネットワークのリセット方法3-1024x576.png)
[ネットワークの詳細設定]をクリック
[ネットワークとインターネット]をクリックすると「ネットワークとインターネット」と大きく書かれたページに移動します。
そのページを少し下にスクロールして[ネットワークの詳細設定]をクリックしてください。
![ネットワークのリセット方法 Step3 [ネットワークの詳細設定]をクリック](https://jo-sys.net/wp-content/uploads/2022/09/パソコンのインターネット接続が不安定なときに試してほしいネットワークのリセット方法4-1024x576.png)
[ネットワークのリセット]をクリック
[ネットワークの詳細設定]をクリックすると「ネットワークとインターネット > ネットワークの詳細設定」と大きく書かれたページに移動します。
そのページの中にある[ネットワークのリセット]をクリックしてください。
![ネットワークのリセット方法 Step4 [ネットワークのリセット]をクリック](https://jo-sys.net/wp-content/uploads/2022/09/パソコンのインターネット接続が不安定なときに試してほしいネットワークのリセット方法5-1024x576.png)
[今すぐリセット]をクリック
次の画面に進むと以下の注意書きが表示されます。
すべてのネットワークアダプターが削除された後、再インストールされ、その他のネットワークコンポーネントの設定が元の設定に戻ります。その後VPNクライアントソフトウェアや仮想スイッチなどの他のネットワークソフトウェアの再インストールが必要な場合があります。
Windowsからの確認メッセージ
ここで言われている「元の設定」というのは工場出荷状態です。
登録したWi-Fi情報は残されていますが、ネットワークアダプターはすべて削除されるので注意してください。
問題なければ[今すぐリセット]をクリックしてください。
![ネットワークのリセット方法 Step5 [今すぐリセット]をクリック](https://jo-sys.net/wp-content/uploads/2022/09/パソコンのインターネット接続が不安定なときに試してほしいネットワークのリセット方法6-1024x576.png)
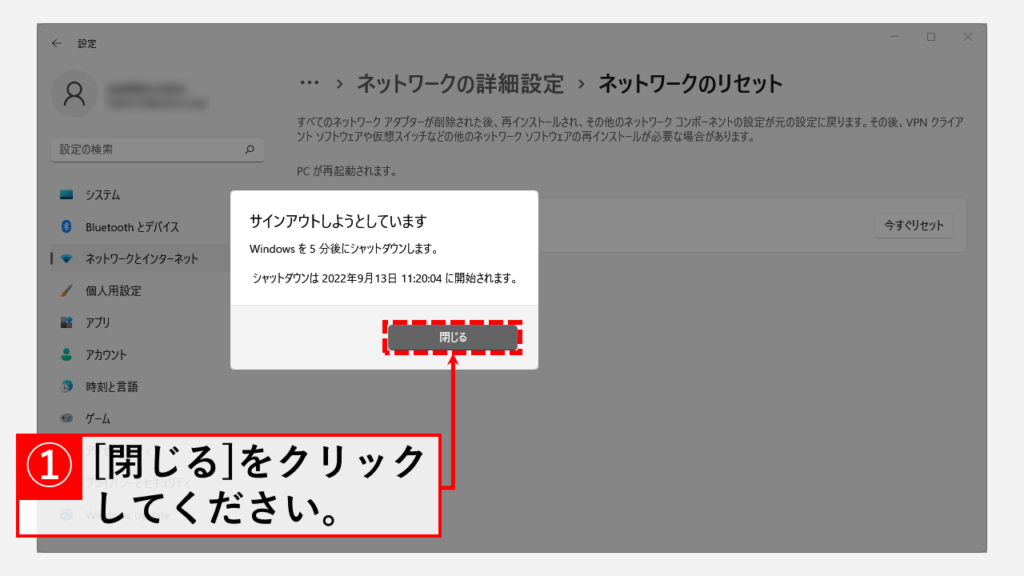
[今すぐリセット]をクリックすると「ネットワーク設定をリセットしますか?」と確認メッセージが表示されます。
[はい]をクリックしてください。
![ネットワークのリセット方法 Step5 確認メッセージで[はい]をクリック](https://jo-sys.net/wp-content/uploads/2022/09/パソコンのインターネット接続が不安定なときに試してほしいネットワークのリセット方法7-1024x576.png)
[はい]をクリックすると「サインアウトしようとしています」と表示されるので、[閉じる]をクリックしてください。
予め作業中のものをすべて保存しておいてください。
パソコンの再起動が終わるとネットワーク設定がリセットされています。
ネットワーク設定がリセットされたら次はドライバーのアップデートを行ってください。
ネットワークをリセットした後にやるべきこと
ネットワークをリセットしたら必ずネットワークアダプターのドライバーソフトウェアをアップデートしてください。
ドライバーのアップデートは、メーカー(Intelなど)の公式サイトから行う方法と、Windowsアップデートを通じて行う方法があります。
メーカー(Intelなど)の公式サイトからネットワークアダプターのドライバーをアップデートするにはこちらの「Windows11でドライバーソフトを最新版に更新する方法(Intel編)」をご覧ください。
Windowsアップデートを通じてネットワークアダプターのドライバーをアップデートするにはこちらの「オプションの更新プログラムを利用してもっとWindows Updateを活用する」をご覧ください。
コマンドプロンプトを使ってネットワークをリセットする方法
ネットワークをリセットをするためのコマンドもいくつかあるので紹介します。
| コマンド | コマンドの説明 |
|---|---|
| ipconfig /release | 今取得しているIPアドレスを開放します。 ※IPアドレスが固定されている場合は変わりません。 |
| netsh winsock reset | WindowsのSocket接続(アプリケーションとインターネットの間に存在するインターフェース)をリセットします。 |
| netsh int ip reset all | インターネットプロトコル設定をデフォルト値に戻します。 |
| netsh winhttp reset proxy | プロキシ設定をリセットし、プロキシを使わない接続に切り替えます。 |
| netsh interface tcp reset | TCPのパラメータを初期化します。 |
| ipconfig /flushdns | DNSリゾルバキャッシュを削除します。 |
| ipconfig /renew | IPアドレスを再取得します。 |
説明が複雑な機能もあるので、上記のコマンドを上から順に試してみてください。
※プロキシを使った接続をしている場合は初期化されてしまうので注意してください。
その他Windows11に関する記事
その他Windows11に関する記事はこちらです。ぜひご覧ください。
-

【Windows11】デスクトップのアイコンが勝手に移動する原因と解決策をわかりやすく解説
Windows11でデスクトップのアイコンが勝手に移動してしまい、「せっかく整理したのにまたバラバラ…」と悩んでいませんか? 実は、このトラブルの多くは「アイコンの自動... -
Windows11でIE(インターネットエクスプローラー)を起動する方法
こんな人にオススメの記事です IE(インターネットエクスプローラー)を使う必要がある人 Windows11でIE(インターネットエクスプローラー)を起動する方法を知りたい人... -
Windows11で複数のファイルをまとめて印刷する方法
こんな人にオススメの記事です 複数種類のファイル(PDFやWordなど)をまとめて印刷したい人 一種類のファイルをまとめて印刷したい方 大量のファイルを一括で印刷した... -
ディスクの空き容量をWindows標準機能でガッツリ増やす方法10選
この記事では、Windowsの標準機能のみを使ってディスクの空き容量をガッツリ増やす方法をご紹介します。 Windowsにとって非常に重要なCドライブがいっぱいになってしま... -
Windows11 24H2を今すぐダウンロードしてアップデートする方法
こんな人にオススメの記事です Windowsアップデートを待たずにWindows11 24H2をインストールしたい人 今すぐWindows11 24H2にアップデートしたい人 手動でWindows11 24H... -
【Windows11】自分のPCスペックを確認する方法|CPU・メモリ・グラボ
「このアプリ、今のPCスペックで動くかな?」「PCスペックって、どこを見ればいいの?」――新しいアプリやゲームを導入するときに、性能が分からず困った経験はありませ... -
PCを起動した日時とシャットダウンした日時を確認する方法 Windows11
こんな人にオススメの記事です パソコンの起動/終了のログ(履歴)を確認したい人 パソコンを最後に起動した日時を確認したい人 イベントビューアーの便利な使い方を知... -
Windows11でタスクバーの色を変更する方法!基本設定からトラブル対策まで徹底解説
こんな人にオススメの記事です タスクバーの色を変更したい人 「スタートとタスクバーにアクセントカラーを表示する」をオンにできなくて困っている人 タスクバーの色を... -
【Windows11】Windowsツールの開き方|実はスタートメニューにあります
Windows11にアップグレードしたら、「Windowsツール」がどこにあるか分からなくなった――。 この記事では、そんな悩みを解決するため、「Windowsツール」を簡単に見つけ...


最後までご覧いただきありがとうございました。
このサイトは情シスマンが半径3m以内のITに関する情報を掲載してるサイトです。
Windows系を主として、ソフトや周辺機器の操作や設定について画像も用いながらわかりやすく解説しています。
解説している内容に誤りがあった場合や、補足が必要な場合、もっと知りたい場合はこちらのお問い合わせフォームからご連絡ください。
個人の方を限定にサポートさせていただきます。
実行環境
Windows11 Home 24H2
64 ビット オペレーティング システム
11th Gen Intel(R) Core(TM) i7-11375H @ 3.30GHz 3.30 GHz
16.0 GB RAM
Microsoft 365